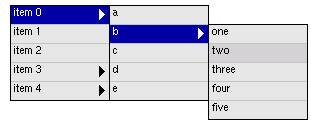
Revision: Now supports MouseOver's to open the next menu - by setting the overOpen property. It still needs a bit of work, such as a system to close the menu's when the document has been clicked outside the MenuList.
The MenuList object creates a cascading menu using the List object.

It is a recursive object, one list links to another and so on. There's no limit to the amount of MenuList's you can have nested, and it's really easy to set up. The List object provides all the item selection, rollovers, and event handling, the MenuList object simply makes it recursive and links the list's together by hiding and showing them when clicked.
You must include the following DynAPI files:
<script language="JavaScript" src="dynlayer.js"></script>
<script language="JavaScript" src="list.js"></script>
<script language="JavaScript" src="menulist.js"></script>
There's 2 types of MenuLists, the first menu in a heirarchy is one type (main-menu), all other MenuLists inside it are the other (sub-menu). To create that initial MenuList you use the following comand:
objectName = new MenuList(x,y,width,itemH)
In the List object alone, the itemH property (the height of the items) is optional, however to build a MenuList object that with that option is far too complex. So you I have made this manditory.
Usually you'll want to assign an image to the list, this will reflect the arrow image that identifies a particular item to contain another list:
objectName.list.setImage('list-img0.gif','list-img1.gif',12,18)
You do not have to manually assign an item's hasImage property, this is automatically done when you add a sub-menu.
You then proceed to add items to the list:
objectName.list.add(value,text)
I think you'll usually want to have a non-breaking space in the text, so it'll usually look like:
objectName.list.add('myvalue',' My Item Text')
Then you do the usual build(), write(css), write(div), activate() sequence.
To add a sub-menu to the MenuList, you must use an alternate constructor:
mysubmenu = new MenuList(parentMenu, parentItemIndex)
parentMenu refers to which MenuList object this submenu is going to attach to.
parentItemIndex is the index of the item that will bring up this menu. Sub-menu's must be defined before you build the main-menu.
Once a sub-menu has been defined, you can add items to it's list object as well. However, you do not have to call a sub-menu's build() or activate() method because this is automatically taken care of when you build() and activate() the main-menu.
Example:
mymenu = new MenuList(50,70,150,20)
mymenu.list.setImage('list-img0.gif','list-img1.gif',12,18)

mymenu.list.add(0,' item 0')
mymenu.list.add(1,' item 1')
mymenu.list.add(2,' item 2')

mysubmenu = new MenuList(mymenu,0)
mysubmenu.list.add(0,' item 0')
mysubmenu.list.add(1,' item 1')
mysubmenu.list.add(2,' item 2')

mymenu.build()
// write mymenu.css, mymenu.div, and call mymenu.activate()
By default, sub-menus inherit it's parent's width, and the list's font and color settings. However if you wanted to, you could assign different settings for each MenuList in a hierarchy.
mymenu = new MenuList(50,70,150,20)
...
mysubmenu = new MenuList(mymenu,0)
mysubmenu.w = 200
...
The MenuList supports an unlimited number of nesting, you just keep adding more. You'll probably want to come up with a naming convention like (mymenu - mymenu0 - mymenu0_0 - mymenu0_0_0, and so on)
mymenu = new MenuList(50,70,150,20)
mymenu.list.setImage('list-img0.gif','list-img1.gif',12,18)

mymenu.list.add(0,' item 0')
mymenu.list.add(1,' item 1')
mymenu.list.add(2,' item 2')

mymenu0 = new MenuList(mymenu,0)
mymenu0.list.add(0,' item 0')
mymenu0.list.add(1,' item 1')
mymenu0.list.add(2,' item 2')

  mymenu0_0 = new MenuList(mymenu0,0)
  mymenu0_0.list.add(0,' item 0')
  mymenu0_0.list.add(1,' item 1')
  mymenu0_0.list.add(2,' item 2')

mymenu1 = new MenuList(mymenu,1)
mymenu1.list.add(0,' item 0')
mymenu1.list.add(1,' item 1')
mymenu1.list.add(2,' item 2')

  mymenu1_2 = new MenuList(mymenu1,2)
  mymenu1_2.list.add(0,' item 0')
  mymenu1_2.list.add(1,' item 1')
  mymenu1_2.list.add(2,' item 2')

mymenu2 = new MenuList(mymenu,2)
mymenu2.list.add(0,' item 0')
mymenu2.list.add(1,' item 1')
mymenu2.list.add(2,' item 2')

// and so on, you get the idea

mymenu.build()
The names of the objects are arbitrary, make them whatever you want as long as you know what they represent.
There's lots of internal stuff that you'll probably never have to touch, but these are the ones worth mentioning:
Properties:
Methods:
As in my other List-based objects, the MenuList incorporates it's own onSelect event handler to "do stuff" when you click on an item. A MenuListRedirect is provided as a way to redirect the browser when an item is select. Note the subOnSelect property, by default items that open up sub-menus will not generate an onSelect event, but this can be overridden with this property.
Example usage of onSelect:
mymenu.onSelect = MenuListRedirect
Example: menulist1.html [source] - a simple MenuList example with overOpen.
Example: menulist2.html [source] - a MenuList example with 2 lists, hidden by default with an alternate color scheme.
Example: menulist3.html [source] - uses the MenuListRedirect handler to switch pages
Also read the corresponding MenuBar Object which is designed to control multiple MenuLists.
| Home | Next Lesson: MenuBar Object |