Note: I forgot to remove some debugging stuff from this when I originally posted it (030401999) - it popped up an alert when you clicked on an item. I haven't updated the tutorial downloadable zip though, so you use the version posted here.
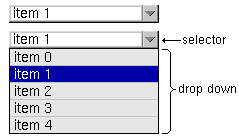
The SelectList object replicates an HTML Select List. I used to have a Select object that was similar to this, however the SelectList object contains entirely new code, and works a lot better. If you used the previous Select object, remove it and use this code instead. This object leverages off the existing List Object, and wraps it in a package resembling a selection widget.

You must include the following DynAPI files:
<script language="JavaScript" src="dynlayer.js"></script>
<script language="JavaScript" src="list.js"></script>
<script language="JavaScript" src="selectlist.js"></script>
Create an instance of the SelectList:
objectName = new SelectList(x,y,width,height,listW)
The height refers to the height of image that's used - the selector, as I call it for lack of a better name. listW is an optional parameter for setting the width of the actual drop down list part, it's just a customizing option, I'll explain it further below. There is no way to set the height of the drop down part because that just depends on how many items are in the list.
All the functionality of the List Object is available to the SelectList Object. In the code for the SelectList, there is a list property which is in fact a List object. So to add items or change the configuration of the List in the SelectList Object, you just apply them using:
objectName.list.propertyName
or
objectName.list.methodName()
Example:
myselect = new SelectList(100,100,150,18)
myselect.list.add('zero','item 0')
myselect.list.add('one','item 1')
myselect.list.add('two','item 2')
myselect.list.add('three','item 3')
myselect.list.add('four','item 4')
Setting the Image
The image that is used for the selector is actually 3 images, a left image, right image, and a middle image that is stretchable so that you can use the same set of images for SelectLists of different widths (this is was not available in the old Select Object).
myselect.setImage(imageL,imageM,imageR,imageLw,imageRw)
You must send the widths of the left and right images (imageLw, and imageRw respectively) in order for the middle image to stretch to the remaining space.
My selector image shown above is the result of these three images:
| select-imgL.gif |
| select-imgM.gif |
| select-imgL.gif |
The call to setImage() would be:
myselect.setImage('select-imgL.gif','select-imgM.gif','select-imgR.gif',10,18)
The left image is 10 pixels wide, the right is 18 pixels wide, and all the heights are 18 - remember the height is set in the constructor.
As always it follows the build(), write CSS, write Div, activate() sequence. Here's the first full example:
<html>
<head>
<title>The Dynamic Duo - SelectList Object Demo</title>
<script language="JavaScript" src="../dynlayer/dynlayer.js"></script>
<script language="JavaScript" src="../list/list.js"></script>
<script language="JavaScript" src="selectlist.js"></script>
<script language="JavaScript">

function init() {
	myselect.activate()
}

myselect = new SelectList(100,100,150,18)
myselect.list.add('zero','item 0')
myselect.list.add('one','item 1')
myselect.list.add('two','item 2')
myselect.list.add('three','item 3')
myselect.list.add('four','item 4')
myselect.setImage('select-imgL.gif','select-imgM.gif','select-imgR.gif',10,18)
myselect.build()

writeCSS (
myselect.css
)

</script>
</head>

<body bgcolor="#ffffff" onLoad="init()">

<script language="JavaScript">
document.write(myselect.div)
</script>

</body>
</html>
Example: selectlist1.html [source] - for this example.
The colors, fonts and everything for the actual List part of the SelectList is handled by the List Object (eg. objectName.list.color.textSelected). However there are the following properties that are specific to the SelectList:
fontname = 'Helvetica'
fontsize = 11
color.text = '#000000'
color.border = '#000000'
The font properties refer only the the text that is in the "selector" (overtop the selector image). color.text is the color of the selector text, and color.border is the color of the 1 pixel border around the drop down part of the SelectList (it is only available as 1 pixel in size, if you want to add more or remove it you'd have to edit the source code).
At any time you can retrieve information from the list by retrieving the list.value or list.selectedIndex properties, as well as anything else in the list such as list.itmes[x].value.
However, do note: you cannot use the List's onSelect Event (list.onSelect). This event is used by the SelectList, if you overwrite it, the select won't work properly (ie. won't pop back closed). But I have included an onSelect event to the SelectList itself which you use instead:
objectName.onSelect = myFunction

// Do not use objectName.list.onSelect = new myFunction
I've included a SelectListRedirect event handler because the ListRedirect will not work
function SelectListRedirect() {
	location.href = this.list.value
}
Example:
mylist.onSelect = SelectListRedirect
Other Properties and Methods
There are very few things specific to the SelectList, most of it's functionality is provided by the DynLayer and List objects.
Properties:
Methods:
Example: selectlist2-custom.html [source] - for customized SelectList example.
Example: selectlist3-redirect.html [source] - for redirection example.
| Home | Next Lesson: ScrollList Object |