
Scroll(x,y,width,height,frame,name)
Notice the width and height parameters refer to the width and height of the ScrollWindow, they do not take into consideration the dimensions of the ScrollBar and ButtonImages that are attached around the ScrollWindow.
Examples:
myscroll1 = new ScrollBar(20,50,250,200) // not in a frame

myscroll2 = new ScrollBar(20,50,250,200,'myframe') // in a frame named 'myframe'

myscroll2 = new ScrollBar(20,50,250,200,null,'myscrollLayers') // generates layers with the name 'myscrollLayers'
Vertical and Horizontal options
By default the Scroll2 will only have a vertical ScrollBar. If you want a horizontal ScrollBar, or do not want vertical ScrollBar you use these boolean properties (set these immediately after the constructor):
myscroll.useH = true  // make a horizontal scrollbar
myscroll.useV = false // do not make a vertical scrollbar
I'll admit, most of the dimension and setting setting for the Scroll2 is pretty ugly, and I'll bet that 99% of you don't really want to get into too much of the gritty stuff, you want to get to using it in your webpages. So you can thank me for making your life easier by what I call ImageSets. These are a way to make the initialization of a Scroll2 object very very simple. With one line you can set all the dimensions and filenames and everything for a few generic sets of images that I pulled from different operating systems.
If you use one my image sets your initialization will look something like this:
myscroll = new Scroll(20,20,250,170)
myscroll.useH = true // if needed
myscroll.imgSet('/images/windows/',16,16,34)  // windows image set
myscroll.build()
The imgSet() method accepts alot of different parameters all in one line, it will call 2 other methods, setDim() and makeObjects(), and set everything up in order to display that particular set of images properly. The only thing you'll have to worry about is the first parameter, just points to the directory where the set of images are, they have common filenames which cannot change.
If you want a Scroll2 that even slightly deviates from these image sets then you have 2 choices, create your own image set, or do each of your image and dimensions initialization manually.
The files can be downloaded from the tutorial download (in separate directories off the /dynduo/scroll/ directory)
For each demo that I will show, I will use the Java Metal ImageSet.
If you want to have your own set of images you'll need to read the following, otherwise don't worry about it.
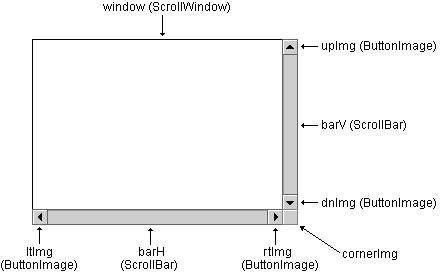
The Scroll2 does follow the build()-writeCSS()-write(div)-activate() sequence however due to the amount of other objects involved you have to do a few other things in order to display a Scroll2. Remember there are 3 types of sub-objects involved in a Scroll2 - ScrollWindow, ScrollBar (2 of them, vertical and horizontal), ButtonImage (4 of them, up down left right arrows). For each of these objects you can set their locations, dimensions, and images that are shown.
The setDim() method is where you'll set the initial locations and dimensions. This is done with only 3 parameters:
myobject.setDim(barW,arrowH,boxH)
If you take a look at the source code to the setDim() method you'll see it does some simple calculations based on those 3 parameters and the width and height to determine where each of the objects will reside. By default they'll be roughly what you see in the diagram at the top.
setDim() will create 6 arrays that contain the parameters that will be sent to the constructor of each of the objects. The values in these arrays can be changed individually. The arrays are named like this:
myobject.dim.barV - vertical ScrollBar
myobject.dim.upImg - up arrow
myobject.dim.dnImg - down arrow
myobject.dim.barH - horizontal ScrollBar
myobject.dim.ltImg - left arrow
myobject.dim.rtImg - right arrow
To change the y-location of the down image you'd change:
myobject.dim.dnImg[1] = 200 // 2nd parameter in constructor of the ButtonImage
To change the width of the horizontal scrollbar you'd change:
myobject.dim.barH[2] += 10 // 3rd parameter in constructor of ScrollBar
Once all your dimensions are set, you must call makeObjects() method, it will create each of the sub-objects:
Once those objects are created you can call any of them at any time (eg. myscroll.window.setMargins(10,10,10,10) ). This new version of the Scroll requires you to use images for everything therefore you muse call the setImages() methods of the ScrollBars and ButtonImages before you build() the Scroll2. The build in the Scroll2 will also build each of the sub-objects so you never have to call myscroll.window.build() etc.
After the makeObjects() is called you can set the images for each of the ScrollBars and ButtonImages. Please read the lessons on the ScrollBar, and ButtonImages for the exact usage of the setImages() in each.
If you only want a vertical scrollbar you'd have a setup something like this:
myscroll = new Scroll(20,20,250,200)
myscroll.setDim(16,16,50)
myscroll.makeObjects()
myscroll.barV.setImages('scroll-bgv.gif','scroll-boxv.gif')
myscroll.upImg.setImages('scroll-up0.gif','scroll-up1.gif')
myscroll.dnImg.setImages('scroll-dn0.gif','scroll-dn1.gif')
myscroll.build()
If you want a horizontal as well you need to have the useH, and call the setImages in the barH, ltImg, and rtImg as well:
myscroll = new Scroll(20,20,250,200)
myscroll.useH = true
myscroll.setDim(16,16,50)
myscroll.makeObjects()
myscroll.barV.setImages('scroll-bgv.gif','scroll-boxv.gif')
myscroll.upImg.setImages('scroll-up0.gif','scroll-up1.gif')
myscroll.dnImg.setImages('scroll-dn0.gif','scroll-dn1.gif')
myscroll.barH.setImages('scroll-bgh.gif','scroll-boxh.gif')
myscroll.ltImg.setImages('scroll-lt0.gif','scroll-lt1.gif')
myscroll.rtImg.setImages('scroll-rt0.gif','scroll-rt1.gif')
myscroll.build()
There is one other image that you can set specifically for the Scroll2 - it's the image in the corner beneath the down arrow, and to the right of the right arrow, the cornerImg (see the diagram above). This is set just as a variable (again before the build():
myscroll.cornerImg = 'scroll-corner.gif'
| Home | Next Lesson: List Object |