| 1.1 | Introduction to Layers |
| 1.1 | Introduction to Layers |
If you're considering making a page with layers you have to be aware of a few things...
The only browser that supports layers is Netscape 4.0. If you design a page using layers and then view it in another browser (Netscape 3.0 or IE 3.0 for example) it will totally mess up. Any JavaScript that uses layers will totally mess up as well. So right away, you have to make your page Netscape 4.0 specific.
Since Netscape 4.0 is not very popular right now, this will limit your audience significantly. So for the time being, it not wise to do an entire web site using layers (in 6 months you might get away with it but not right now). The only practical use right now is for doing "special" things like cool animated demos, or a Netscape 4.0 enhanced version of your page.
When working with layers, usually the entire page has to be done in layers. You often have to separate every element of your page out into chunks such as a set of images, a paragraph, or a title etc. Layers require you to make a web page in a totally different manner than you ever had to before.
Layers by themselves are easy to use, but not all that useful. It's only when you use JavaScript that layers become really cool. So most of this tutorial will revolve around different ways to use JavaScript to affect your layers.
Okay, with that out of the way lets begin...
The LAYER Tag
There's only one tag that you have to learn:
<LAYER></LAYER>
You can put just about anything inside a layer - text, images, java applets, tables etc. For example:
<LAYER>
This is my Layer
<BR><IMG SRC="image.gif">
</LAYER>
For this tutorial, the layers will be rather dull - no images, or anything special. This is to make it easy on me, and because I really don't have anything useful to put in them. Remember that for any of the examples in this tutorial, you can replace the dull boxes or text with spiffy graphics or whatever you want.
There's a ton of options for layers. These came straight off the Netscape Layers Site
| NAME or ID | Identifies each layer |
| LEFT | left co-ordinate of your layer (with respect to it's window or it's parent layer when nesting layers), you can use negative values for LEFT, TOP, PAGEX, and PAGEY |
| TOP | top co-ordinate of your layer |
| PAGEX | the absolute left (x) co-ordinate of your layer (only useful when you're using nested layers) |
| PAGEY | the absolute top (y) co-ordinate of your layer |
| BGCOLOR | background color of your layer, if you do not specify this your layer will be transparent |
| BACKGROUND | same as a background for a whole page |
| VISIBILITY | either SHOW or HIDE a layer |
| CLIP | allows you to change the viewable area of the layer |
| WIDTH | total width of the layer |
| HEIGHT | total height of the layer |
| Z-INDEX | Determines how your layers will stack up on eachother, by default they are stacked in the order you define them (the first layer has stacking of 0 and they go up from there) |
| SRC | specifies an external file to be the contents of the layer |
Rarely do you ever have to specify all of these attributes. Here's an example of the ones I'll be using most:
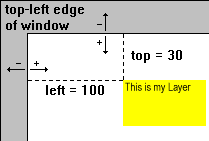
<LAYER NAME="mylayer" LEFT=100 TOP=30 BGCOLOR=#FFFF00 WIDTH=150 HEIGHT=100 CLIP="0,0,160,110">
This is my Layer
</LAYER>
The LEFT and TOP values use a coordinate system where the origin is the top-left hand corner of the browser window, and down and left are the positive directions. The below image should explain it.
I encourage you to fool around with each of the attributes and see for yourself what they do.
What the heck's a CLIP?
For the most part, layers are self-explanatory. The only thing that's a little confusing is the CLIP value.
Remember that any layer you have is defined as a rectangle - it has a left, top, right and bottom edge. By using CLIP="x,x,x,x" you can change these values respectfully. But when you do this, you set the value with respect to the top-left corner of the layer - in other words, the corner of the layer becomes the origin. In the first example I used a clip value of "0,0,160,110" - this means that I want the left and top value to stay where they are, and I want the right edge to be 160 pixels away from the origin, and the bottom edge to be 110 pixels away from the origin. Remember I set the WIDTH to be 150 and the HEIGHT to be 100, so by clipping to "0,0,160,110" I added 10 pixels to both the right and bottom edge.
To go even further, if I wanted to add 10 pixels to all the sides I would have had to set the clip value to "-10,-10,160,110". I go into negative values because the original top-left corner of the layer is now the origin, so by adding pixels to the left and top I am now going into the negative region of the layer. This is sort of a tricky thing that you basically have no choice but to get used to.
You can of course use clipping to "clip" portions of your layer away. By setting the values so they are less than the width and height of the layer, parts of the layer will disappear. Try experimenting with this aspect for yourself... it will be important later.
| 1.1 Introduction
1.2 Overlapping 1.3 Nesting 1.4 Using JavaScript |
2.1 Sliding Layers
2.2 Pre-Built Functions 2.3 Clipping Layers 2.4 Looping Animations 2.5 Changing Images |
3.1 Mouse-Click Animation
3.2 Capturing Keystrokes 3.3 Drag and Drop 4.1 Making Demos 4.4 Problems 4.5 Screen Sizes |
| ||